Practical Compromise Recovery Guidance for Active Directory
Today I’m going to blog about compromise recovery in an Active Directory forest. I’ve been blogging for a while and have read tons of stuff about Active Directory, but one thing has been missing. Which is how we can recover from an active attacker?
There hasn’t been many articles or blog posts around recovering an AD forest. Sure, when you search on the internet. You probably end up with the one from Microsoft, which can be found here. However, it might lack the in-depth examples. This makes it (IMO) harder for admins to understand the necessary steps, that needs to be taken. In order to reduce further damage, when there is an live incident.
The goal of this blog post is to explain how to recover Active Directory from an active attack with minimal disruption. This is not an Active Directory Security Assessment, and no. We’re also not going to cover attacks related to AD. Goal of this blog post is to ensure that our Tier-0 resources are protected from further compromise.
I’ve decided to blog about this due to all the ransomware attacks, we’ve seen in the news. Entire networks are being encrypted, and even when companies are paying the ransomware. I’m not always confident that they have put effort in looking at their current AD configuration.
Audience
This blog post is targeted for the following audience:
- An organization that just had their entire network being encrypted, but decided to pay the ransomware and is now looking for a remediation & hardening strategy for Active Directory to re-establish trust.
- An organization that is looking for a compromise recovery plan once an attacker has access to their systems.
- Incident Responders
- Windows & AD Admins
Backup Domain Controllers
A Domain Controller is a server that responds to authentication requests and verifies users on computer networks. It holds the Active Directory database, which stores all the users and computers. These kind of servers are mission critical, and needs to be protected first.
It is recommended to back-up at least one writable Domain Controller in each domain, so you have different back-ups to choose from. In this blog post, we are going to use the Recovery Service Vault in Azure. However, it’s not necessary important which solution is being used. Feel free to pick one that you prefer.
A Recovery Services vault is a management entity that stores recovery points created over time and provides an interface to perform backup related operations. This includes taking on-demand backups, performing restores, and creating backup policies.
When we want to take back-ups of our On-Premises DC’s. We have to install the Microsoft Azure Recovery Services (MARS) agent on our Domain Controllers.
Once we have done that, we can register the machine and start making system state backups.

We also can get the overview of the status for each action we take like making backups or restoring the backups.

After we have finished making system state backups of our Domain Controllers. We can run the following script to verify on which date our AD has been backed-up.
Script
# Source: https://adamtheautomator.com/backup-domain-controller/
$domainControllers | foreach {
    $backups = repadmin.exe /showbackup $_

    ## Capture the output ofrepadmin
    $output = @{ 'DomainController' = $_ }

    ## Start collectingproperties for output
    for ($i = 0; $i -lt $backups.Count; $i++) { ## Begin looking atrepadmin output
        if ($backups[$i] -match '^(CN|DC)') { ## If the line has apartition.
            ## Assign the partition name and the date/time to the output hashtable
            ## and send $output with the DomainController, Partition and DateTime
            $output.Partition = $backups[$i]
            $output.DateTime = [regex]::Match($backups[$i +2],'(\d{4}-\d{2}-\d{2} \d{2}:\d{2}:\d{2})').Groups[1].Value
            [pscustomobject]$output
        }
    }
}
Result
At the sample result, we can see the date of when the last backup was been made.

Scope of Compromise
Our Tier-0 assets are the most important thing to protect first, because an attacker is likely going after an identity or system that provides escalation paths to Domain Admin or equivalent.
In this section we are going to discover all our Tier-0 accounts and the servers that belong to Tier-0.
Definition of Tier-0:
“Tier-0 is the highest level and includes administrative accounts and groups, domain controllers, and systems that have direct or indirect administrative control of an Active Directory forest.”
- Tier-0 accounts
An example of Tier-0 accounts can be all the accounts that are member of at least one protected group or are admins on Tier-0 servers for example.
- Domain Admins
- Enterprise Admins
- Schema Admins
- Administrators
- Account Operators
- Backup Operators
- Server Operators
- Print Operators
- Cert Publishers
- DnsAdmins
- Accounts configured for Unconstrained Delegation
- Service accounts running as service on a Tier-0
- Local Admins on Tier-0 servers (e.g. ADCS, AAD Connect, ADFS, etc)
- ACE with Write permissions on GPOs linked to Tier-0 servers
- ACE that has “Issue & Manage Certificates” or “Manage CA” permission on an ADCS server
To discover all the members that are part of a protected group. Run the following command:
([adsisearcher]'(&(objectClass=user)(adminCount=1))').FindAll()Result
At the sample results, we can see a couple of users that are part of at least one of the protected groups.

Accounts configured for Unconstrained Delegation
Run the following command:
([adsisearcher]'(&(objectCategory=user)(userAccountControl:1.2.840.113556.1.4.803:=524288))').FindAll()Result
At the sample results, we can see that one account is configured for Unconstrained Delegation.

- Tier-0 sensitive objects
Permissions can be delegated on sensitive AD objects like the DNC object, MicrosoftDNS container, AdminSDHolder container, and the GPOs linked to Tier-0 systems. All the ACEs with GenericAll or the following equivalent permissions:
- GenericAll
- GenericWrite
- WriteOwner
- WriteDacl
- ExtendedRight
- DS-Replicate-Get-Changes & DS-Replicate-Get-Changes-All (Domain Object) -> DCSync Permissions to extract NT hashes
All the ACEs that have sensitive permissions on the mentioned AD objects are considered as Domain Admin or equivalent as well.
Enumerate ACLs on the DNC object
Run the following command:
$ADSI=[ADSI]"LDAP://DC=fabrikam,DC=com"
$ADSI.psbase.get_ObjectSecurity().getAccessRules($true, $true,[system.security.principal.NtAccount])
Result
At the sample results, we can see all the ACEs that are delegated on the Domain Naming Context object.

Enumerate ACLs on the AdminSDHolder container
Run the following command:
$ADSI=[ADSI]"LDAP://CN=AdminSDHolder,CN=System,DC=fabrikam,DC=com"
$ADSI.psbase.get_ObjectSecurity().getAccessRules($true, $true,[system.security.principal.NtAccount])
Result
At the sample results, we can see all the ACEs with the permissions on the AdminSDHolder container. This container can only be modified by a DA or equivalent.

Enumerate ACLs on the MicrosoftDNS container
Run the following command:
$ADSI=[ADSI]"LDAP://CN=MicrosoftDNS,CN=System,DC=fabrikam,DC=com"
$ADSI.psbase.get_ObjectSecurity().getAccessRules($true, $true,[system.security.principal.NtAccount])
Result
At the sample result, we can all the ACEs that have permissions on the MicrosoftDNS container.

Members of DnsAdmins
Run the following command:
([adsisearcher]'(memberOf=cn=DnsAdmins,CN=Users,dc=fabrikam,dc=com)').FindAll()Result
At the sample results, we can see 3 members in DnsAdmins. Despite that this group is not a protected group. It still has escalation paths to DA, so all the members are functionally Domain Admins.

- Tier-0 servers
Servers with direct or indirect administrative control over an AD forest are considered as Tier-0, but I like to add the servers that provide escalation paths to Cloud resources as Tier-0 as well.
List all Domain Controllers
Run the following command:
([adsisearcher]'(&(objectCategory=computer)(primaryGroupID=516))').FindAll()Result
At the sample result, we can see all the Domain Controllers in the network.

Servers configured for Unconstrained Delegation (Excluding DC’s)
All the servers that are configured for Unconstrained Delegation provide escalation paths to DA or equivalent and needs to be managed from a Tier-0
Run the following command:
([adsisearcher]'(&(objectCategory=computer)(!(primaryGroupID=516)(userAccountControl:1.2.840.113556.1.4.803:=524288)))').FindAll()Result
At the sample result, we can see 3 servers being configured for Unconstrained Delegation.

Examples of Tier-0 servers:
- Domain Controllers
- Unconstrained Delegation Servers
- Azure AD Connect
- ADFS
- PKI (Certificate Authority)
- Backup servers (e.g. Veeam)
- Local Admins on Tier-0 servers
After we have identified all the Tier-0 servers. We should look at the local admins on those servers, because local admins on Tier-0 servers are indirect DA or equivalent as well.
Discover all the local admins on a remote server (requires admin rights on the server)
Run the following command:
$LocalGroup =[ADSI]"WinNT://Server/Administrators"
$UserNames = @($LocalGroup.psbase.Invoke("Members"))
$UserNames | foreach {$_.GetType().InvokeMember("Name",'GetProperty', $null, $_, $null)}
Result
At the sample result, we can see a user and the Domain Admins groups being part of the local Administrators group on a Tier-0 server.

Create OU structure for Tier-0
Once we have identified all our Tier-0 assets. We need to create a separate OU for all our Tier-0 assets. This can be done with the ‘New-ADOrganizationalUnit’ cmdlet in RSAT.
Run the following commands as admin:
# This requires the RSAT Module being installed

# The command below uses the New-ADOrganizationUnit cmdlet to create a root OU called Tier-0
New-ADOrganizationalUnit -Path 'DC=contoso,DC=com' -Name 'Tier-0' -Verbose

# The commands below use the New-ADOrganizationUnit cmdlet to create five new sub
# OUs called Accounts, Devices, Groups, Service Accounts, Servers

New-ADOrganizationalUnit -Path 'OU=Tier-0,DC=contoso,DC=com' -Name 'Accounts' -Verbose
New-ADOrganizationalUnit -Path 'OU=Tier-0,DC=contoso,DC=com' -Name 'Devices' -Verbose
New-ADOrganizationalUnit -Path 'OU=Tier-0,DC=contoso,DC=com' -Name 'Groups' -Verbose
New-ADOrganizationalUnit -Path 'OU=Tier-0,DC=contoso,DC=com' -Name 'Service Accounts' -Verbose
New-ADOrganizationalUnit -Path 'OU=Tier-0,DC=contoso,DC=com' -Name 'Servers' -Verbose
Result
At the sample result, we can now see our created OU structure. This OUs will have all the Tier-0 objects in it. Move all the Tier-0 objects to the right OUs

As an example, we have moved all the machine accounts that are associated with a server that we consider as Tier-0. All of these objects are stored in the Servers OU for example. We can keep Domain Controllers in the Domain Controllers OU.

Summary
We have identified all our Tier-0 assets in this section, because we have to protect those first from any further damage. This will help us to get through the next section, which will be performing targeted AD hardening. Make sure that you document all the accounts & servers that are Tier-0. Don’t forget the local admins on Tier-0 as well 😉
Remediation & Hardening
In this section, we are going to perform targeted AD hardening to protect our Tier-0 identities and systems. The goal is to reduce the credential footprint of Tier-0 identities and to ensure that our AD forest is re-establishing it’s trust. This includes things like resetting passwords, creating new accounts, rolling out a GPO, etc.
- Deny logon on lower tiers for Tier-0 identities via Group Policy
After we have identified all our Tier-0 accounts and groups. We need to ensure that those accounts cannot logon to a lower trusted system.
The first recommendation is to ensure that the organization has a proper OU structure. Otherwise, this plan can be difficult to accomplish. The second thing is, that we can now create a new Group Policy and configure all the settings, which may look like the following:

After the GPO has been configured, we need to link it to the OU that contains the Tier-1 servers and the regular client workstations. This allows that our DA or equivalent accounts cannot expose their credentials on the lower tiers anymore, because we’ve denied them to logon on those systems.

- Recreate new accounts for Tier-0 identities
In the previous section, we have identified all our Tier-0 accounts. Now we have to recreate a new account for each Tier-0 identity, because it can be challenging to determine if one of those accounts have been compromised or not.
Service accounts that are part of Tier-0 can be a challenge, because once we do that. There will be disruptions, so it’s up to the organization to decide the next steps and evaluate the risks.
Once we recreated new accounts for all the Tier-0 identities. We can start adding them to the AD groups they belong, and so on.
- Reset the password of the old Tier-0 accounts
Move all the old Tier-0 accounts to one OU and reset the password of all those accounts that resides in the OU.
Service accounts can be a big challenge, so if it’s not possible according to an organization. Try to find service accounts, where it may be possible to reset the password of it.
Script
# Replace the OU path with the correct one
$OU = [ADSI]"LDAP://OU=OU 1,DC=fabrikam,DC=com"
$Child = $OU.Get_Children()
ForEach ($User In $Child)
{
If ($User.Class -eq "user")
{
$User.Invoke("SetPassword", "MyTerriblePassw0rdWillNeverBeUsedAnymore!")
$User.SetInfo()
}
}- Disable all the old Tier-0 accounts
We are now going to disable all the old Tier-0 accounts that we’ve just put in a OU. Since all our Tier-0 admins have a new brand account now.
Script
$ObjFilter = "(&(objectCategory=person)(objectCategory=User))"
    $objSearch = New-Object System.DirectoryServices.DirectorySearcher
    $objSearch.PageSize = 15000
    $objSearch.Filter = $ObjFilter
 # Replace the OU path with the correct one
    $objSearch.SearchRoot = "LDAP://OU=OU 0,DC=fabrikam,DC=com"
    $AllObj = $objSearch.FindAll()
    foreach ($Obj in $AllObj)
           {
            $objItemS = $Obj.Properties
            $UserN = $objItemS.name
            $UserDN = $objItemS.distinguishedname
            $user = [ADSI] "LDAP://$userDN"
            $user.psbase.invokeSet('AccountDisabled', $true)
            Write-host -NoNewLine "Account $UserN has been disabled...."
            $user.setinfo()
            Write-host "Done!"
            }
Result
At the sample result, we are now disabling all the old Tier-0 accounts.

- Force all users to change their password at the next logon
An important thing is to force all users to change their passwords at the next logon, which will make all the NT hashes invalid if the attacker has stolen the NTDS.DIT file. This script needs to be ran in every domain in the forest(s).
Script
$PLSValue = 0
$ObjFilter = "(&(objectCategory=person)(objectCategory=User))"
    $objSearch = New-Object System.DirectoryServices.DirectorySearcher
    $objSearch.PageSize = 15000
    $objSearch.Filter = $ObjFilter
    $AllObj = $objSearch.FindAll()
    foreach ($Obj in $AllObj)
           {
            $objItemS = $Obj.Properties
            $UserN = $objItemS.name
            $UserDN = $objItemS.distinguishedname
            $user = [ADSI] "LDAP://$userDN"
            $user.psbase.invokeSet("pwdLastSet",$PLSValue)
            Write-host -NoNewLine "Account $UserN needs to change password at next logon...."
            $user.setinfo()
            Write-host "Done!"
            }
Result
At the sample result, we are forcing every account to change their password at the next interactive logon.

- Reset the password twice of the KRBTGT account
The password of the KRBTGT account needs to be rotated twice in each domain.
Run the following command:
# Reset password of KRBTGT
$adsi = [adsi]"LDAP://CN=krbtgt,CN=Users,DC=fabrikam,DC=com"
$adsi.Invoke("SetPassword", "MyNewPassw0rd!")
$adsi.setinfo()
Wait 24 hours now before you do the second reset.
*24 hours are over*
Run the following command:
# Reset password of KRBTGT
$adsi = [adsi]"LDAP://CN=krbtgt,CN=Users,DC=fabrikam,DC=com"
$adsi.Invoke("SetPassword", "MyNewPassw0rd!")
$adsi.setinfo()
Verify that the password of the KRBTGT has been rotated.
Run the following command:
$user = [adsi]"LDAP://CN=krbtgt,CN=Users,DC=fabrikam,DC=com"
[PSCustomObject] @{
username = $user.name.Value
pwdLastSet = [datetime]::FromFileTime($user.ConvertLargeIntegerToInt64($user.pwdLastSet.
value))
}
Result
At the sample result, we can see the date of when the password of the KRBTGT has been rotated.

- Reset the password of the Azure AD Seamless SSO Account
The password of the AzureADSSOACC$ account needs to be rotated in each domain. In order to do this, Global Admin rights is required as well.
Login on the Azure AD Connect server (Tier-0), because on the AAD Connect server. There is a PowerShell module that does this.
Import-Module “C:\Program Files\Microsoft Azure Active Directory Connect\AzureADSSO.psd1”

New-AzureADSSOAuthenticationContext # Sign in with a Global Admin account

Update-AzureADSSOForest

$Cred = Get-Credential

Update-AzureADSSOForest -OnPremCredentials $Cred
To verify the results, we can run the following command:
$user = [adsi]"LDAP://CN=AzureADSSOACC,CN=Computers,DC=fabrikam,DC=com"
[PSCustomObject] @{
username = $user.name.Value
pwdLastSet = [datetime]::FromFileTime($user.ConvertLargeIntegerToInt64($user.pwdLastSet.
value))
}
Results
At the sample result, we can see the date of when the AzureADSSOACC account has been rotated.

- Rotate ADFS Token Sign Certificate twice
The ADFS token sign certificate needs to be rotated twice. Microsoft has blogged about all the steps, so I’m just going to copy & paste that here.
- Check to make sure that your AutoCertificateRollover is set to True.
Get-AdfsProperties | FL AutoCert*, Certificate*If it is not, you can set it with this command:
Set-ADFSProperties -AutoCertificateRollover $true2. Connect to the Microsoft Online Service
Connect-MsolService3. Document both your on-premise and cloud Token Signing Certificate thumbprint and expiration dates.
Get-MsolFederationProperty -DomainName <domain>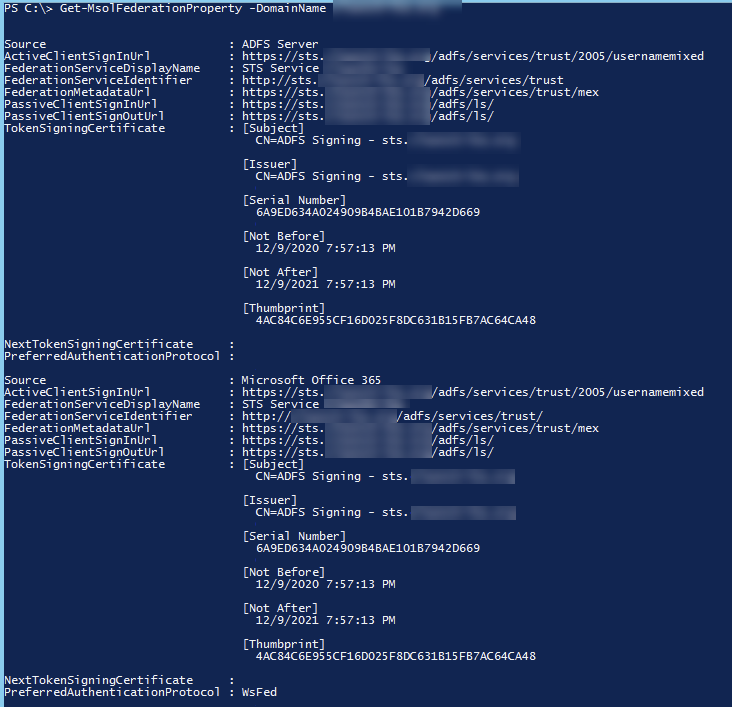
4. Replace the primary Token Signing certificate using the -Urgent switch to cause ADFS to replace the primary certificate immediately without making it a Secondary certificate.
Update-AdfsCertificate -CertificateType Token-Signing -Urgent5. Create a secondary Token Signing certificate without using the -Urgent switch to allow for two on-premise Token Signing certificates, before syncing with Azure cloud.
Update-AdfsCertificate -CertificateType Token-Signing
6. Update the cloud environment with both the primary and secondary certificates on-premise to immediately remove the cloud published token signing certificate. If this step is not completed using this method you leave the potential for the old token signing certificate to still authenticate users.
Update-MsolFederatedDomain -DomainName <domain>
7. Verification that you completed the above steps and removed the certificate that was displayed in Step 3 above.
Get-MsolFederationProperty -DomainName <domain>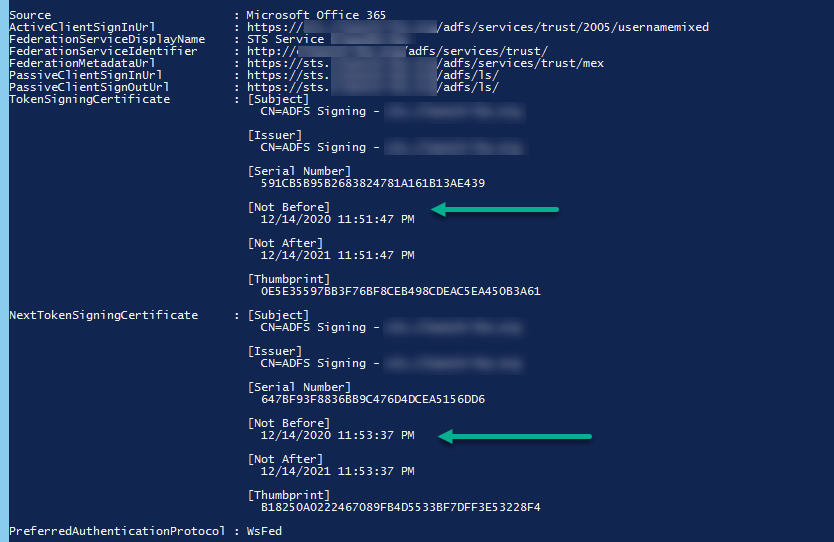
- Rotate all the domain trust keys
- Use the syntax that this command provides for using the NetDom tool to reset the trust password. For example, if there are two domains in the forest—parent and child—and you are running this command on the restored DC in the parent domain, use the following command syntax:
netdom trust parent domain name /domain:child domain name /resetOneSide /passwordT:password /userO:administrator /passwordO:*2. When you run this command in the child domain, use the following command syntax:
netdom trust child domain name /domain:parent domain name /resetOneSide /passwordT:password /userO:administrator /passwordO:*- Reset all the Domain Controllers machine accounts
All the machine accounts of Domain Controllers need to get a reset or otherwise attackers may remain persistent.
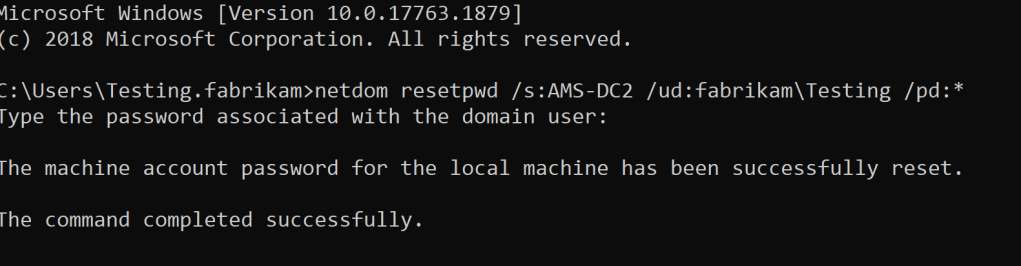
Example
In this example, we are going to reset the machine account of a Domain Controller that’s called ”AMS-DC2”. When it comes down to Domain Controllers. You can’t use the Reset-ComputerMachinePassword cmdlet, because otherwise it would break the synchronization of a DC. This needs to be done on every Domain Controller, and I haven’t found a way to automate this, so better safe than sorry. I don’t want to break your Domain Controllers (:
Steps
- Login locally or via RDP to the Domain Controller whose password you want to change
- Ensure that you have administrative rights locally on the machine and on the computer object in AD (e.g. DA or equivalent)
- If you want to reset the password for a Windows domain controller, you must stop the Kerberos Key Distribution Center service and set its startup type to Manual.
- Open CMD as an administrator and run the following command:
netdom resetpwd /s:<server> /ud:<domain\User> /pd:*6. If you have done everything correctly, you should see something like this
7. Start the Key Distribution Service again and set the startup type back to Automatic
8. Verify that the password of the Domain Controller was updated
$user = [adsi]"LDAP://CN=AMS-DC2,OU=Domain Controllers,DC=fabrikam,DC=com"
[PSCustomObject] @{
username = $user.name.Value
pwdLastSet = [datetime]::FromFileTime($user.ConvertLargeIntegerToInt64($user.pwdLastSet.
value))
}
Result
At the sample result, we can see that the DC machine account has been updated. Make sure that you do this for all your Domain Controllers. Yes, this is a manual task.

/s:<server>is the name of the domain controller to use for setting the machine account password. It’s the server where the KDC is running./ud:<domain\User>is the user account that makes the connection with the domain you specified in the/sparameter. It must be in domain\User format. If this parameter is omitted, the current user account is used./pd:*specifies the password of the user account that is specified in the/udparameter. Use an asterisk (*) to be prompted for the password. For example, the local domain controller computer is Server1 and the peer Windows domain controller is Server2. If you run Netdom.exe on Server1 with the following parameters, the password is changed locally and is simultaneously written on Server2. And replication propagates the change to other domain controllers:
- Reset the password of the AAD Sync account
Most organizations are operating in a hybrid state via Azure AD Connect. It requires a (service) account with the following permissions on the Domain Root to do password hash synchronization:

The password of this account needs to be changed, because an attacker could grab the NT hash of the AAD Sync account to remain persistence. Use a complex password once you are rotating this account.
Run the following command:
# Replace the OU path with the correct path where your AAD Sync account is stored
$adsi = [adsi]"LDAP://CN=SVC_ADSync,OU=Service accounts,DC=fabrikam,DC=com"
$adsi.Invoke("SetPassword", "MyIncredibleComplexPassw0rdThatYouCantCrackBro")
$adsi.setinfo()
We can verify that the password has been changed by the following command:
$user = [adsi]"LDAP://CN=SVC_ADSync,OU=Service accounts,DC=fabrikam,DC=com"
[PSCustomObject] @{
username = $user.name.Value
pwdLastSet = [datetime]::FromFileTime($user.ConvertLargeIntegerToInt64($user.pwdLastSet.
value))
}
Result
At the sample result, we can see that the password has indeed changed.

- Randomize the local admin password on all the workstations and member servers
Local Administrator Password Solution (LAPS) is a password manager that can be used to automatically rotate the Built-in Administrator (RID-500) account on each individual workstation or server. It is not perfect, but it works and it’s free as well. Roll out LAPS if the organization doesn’t has any solution in place to randomize the local admin password on each system.
NOTE: Do not roll out LAPS on the Domain Controllers
- Link the GPO to the OU of all the workstations and member servers

2. The location of where the LAPS package is stored

3. Configure the settings

4. Verify that the LAPS installation has succeeded
Get-AdmPwdPassword -ComputerName "Client"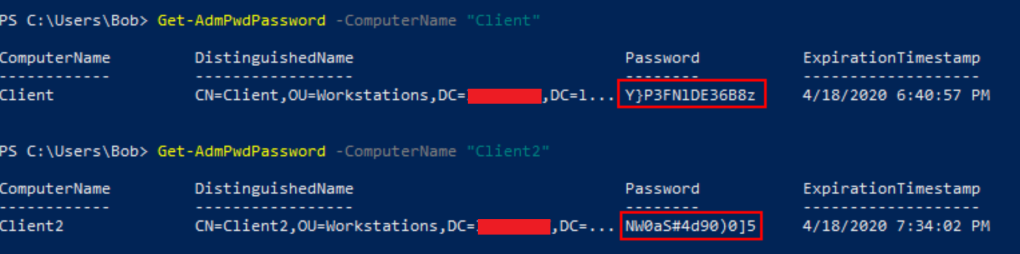
Active Directory Certificate Services
AD CS provides escalation paths to full domain compromise, which means that the server needs to be treated as a Tier-0. However, even when an organization has decided to treat it as a Tier-0. Misconfigurations may still exists that opens the door for an attacker to make use of. This section will include examples of misconfigurations that needs to be removed to keep the domain secure.
- Verify the permissions that have been granted on the root level of the Certificate Authority.
Organizations should restrict “Issue & Manage Certificates” and “Manage CA” to administrative groups that are part of the Tier-0 zone. Remove any account or group that is not part of the Tier-0 zone.

Result
At the sample result, we can see Edwards has the “Manage CA” permissions, but this user is not a Tier-0 or equivalent. Since that is the case, we will revoke the permission of Edwards. Do this for your environment as well.

2. Remove misconfigured templates (Supply in Request & Client authentication)
AD CS certificates that enable domain authentication and have been misconfigured can lead to a full domain compromise.
On a certificate template, there is an option to allow the requester to specify which principal the certificate can be used for. This setting looks like the following and is called a ‘Subject Alternative Name’ (SAN).

If the SAN has been set on a certificate template, and that certificate template supports client authentication. An attacker could request a certificate for any user within the domain. Once the certificate has been successfully requested. An attacker can obtain a TGT for any user that it wants, which can be a Domain Admin.

Result
Every ACE that can ‘Request Certificates‘ and ‘Enroll‘ to the misconfigured template could obtain a TGT for any user that it wants. The following actions needs to be done at minimum to prevent this:
- Uncheck the box ‘Supply in Request’
- Remove ‘Client authentication’ EKU OID
- Enable ‘CA Manager Approval’
- Require ‘Authorized Signatures’
3. Remove misconfigured templates (Any Purpose & None) – Persistence
There are two other Extended Key Usages (EKU) OID that are vulnerable, which are the following:
- Any Purpose
- None
These can EKU OIDs can be found at Extensions -> Application Policies on an Certificate Template.

Result
Every ACE that can ‘Request Certificates‘ and ‘Enroll‘ to an misconfigured template that has the following EKU OIDs configured:
- Any Purpose
- None
Would be able to obtain a TGT as the requested principal.
An attacker can use the requested template to authenticate to AD, as the user who requested them. This would be a great persistent mechanism that probably goes unnoticed.
An realistic scenario would be compromising a Domain Admin and then request an authentication certificate for the compromised Domain Admin. This means that once an attacker has access again. It could obtain the TGT of the compromised Domain Admin.
The following actions needs to be done at minimum to prevent this:
- Remove ‘Any Purpose’ EKU OID
- Enable ‘CA Manager Approval’
- Require ‘Authorized Signatures’
- Revoke the Certificate Template for every user that has requested it.
4. ACE with Write Permission on a Certificate Template
An ACE with the following permission on a Certificate Template:
- GenericAll
- GenericWrite
- AllExtendedRights
- WriteOwner
- WriteDacl

Would be able to set the insecure setting or known as ‘Supply in Request‘ on a certificate template. It can then add a new EKU OID to the template, which can be Client authentication. This allows an attacker to request a certificate for any user within the domain, so it could then obtain a TGT for any user within the domain.
Result
Every ACE that has the rights to ”Write” against a Certificate Template has the ability to set and configure insecure settings, which could lead to compromising an entire domain. This is why ADCS needs to be treated from a Tier-0 perspective. Every ACE that is not a Tier-0 should not have the rights to modify a Certificate Template.
All the Certificate Templates are stored in the following container:
- CN=Certificate Templates,CN=Public Key Services,CN=Services,CN=Configuration,DC=yourdomain,DC=com
5. Certificate Templates with sensitive EKUs
Every ACE that can request a certificate and especially enroll to a Certificate Template with one of the sensitive EKUs should be reviewed closely. Here is an example of a template with sensitive EKUs.

Result
Review every certificate template that contains one of the following EKUs:
- Client Authentication with “Supply in Request” enabled
- PKINIT Client Authentication
- Smart Card Logon
- Any Purpose
- SubCA
Once we have discovered a certificate template that contains one of the following EKUs. The following best practice is recommended to limit the impact of a breach:
- Restrict the enrollment in the certificate template to only privileged groups
- Review if the certificate template is still needed and why?
6. Hardening practices: Certificate Authority Web Enrollment & Certificate Enrollment Web Services
Certificate Authority Web Enrollment and Certificate Enrollment Web Service can be abused to issue certificates by performing an NTLM Relay Attack. This attack can lead into full domain compromise, because it can enforce a DC to authenticate with the relay listener and then start relaying NTLM credentials to the targeted AD CS server.

Result
The following best practices are required in order to mitigate this attack:
- Remove the installed services: Certificate Enrollment Web Service and Certification Authority Web Enrollment on the installed ADCS server (if applicable).
If it is not possible to remove any of these roles. The following best practices are recommended:
- Enable SMB Signing on the ADCS server.

- Disable NTLM Provider
Disable NTLM Provider and select Negotiate:Kerberos in the IIS Manager console on the ADCS server.

- Require Extended Protection
Start requiring ”Extended protection” in the IIS Manager console on the ADCS server.

7. EDITF_ATTRIBUTESUBJECTALTNAME2
EDITF_ATTRIBUTESUBJECTALTNAME2 is a special flag that is set on the CA, any request (including when the subject is built from Active Directory®) can have user defined values in the Subject Alternative Name (SAN). This means that an attacker can enroll in ANY template configured for domain authentication, which allows unprivileged users to enroll and obtain a certificate to authenticate as any Domain Admin for example.
If we run the following command on the ADCS server:
reg query HKEY_LOCAL_MACHINE\SYSTEM\CurrentControlSet\Services\CertSvc\Configuration\contoso-DC-CA\PolicyModules\CertificateAuthority_MicrosoftDefault.Policy /v EditFlagsWe can see that it has a default value, which is “EditFlags” with “0x11014e”.

An attacker can enable an insecure configuration by running the following command as an admin on the ADCS server:
certutil -config "DC\contoso-DC01-CA" -setreg policy\EditFlags +EDITF_ATTRIBUTESUBJECTALTNAME2Here we can see that the change was successfully. This setting enforces the Certificate Authority to accept a user-selected SAN for every certificate template that is listed by an enrollment service. By default, this is not enabled.

Result
Every ACE that has local admin on the ADCS server would be able to flip this insecure configuration, so it could enroll in any template to obtain a TGT for every user that it wants.
If this value has been set to “0x15014e”, it means that the insecure setting has been set on the ADCS server.

In order to remediate this, we need to run the following command:
certutil -config "DC\contoso-DC-CA" -setreg policy\EditFlags -EDITF_ATTRIBUTESUBJECTALTNAME2This would change the value back to “0x11014e”, which is the default secure configuration.

Deploying EDR solution
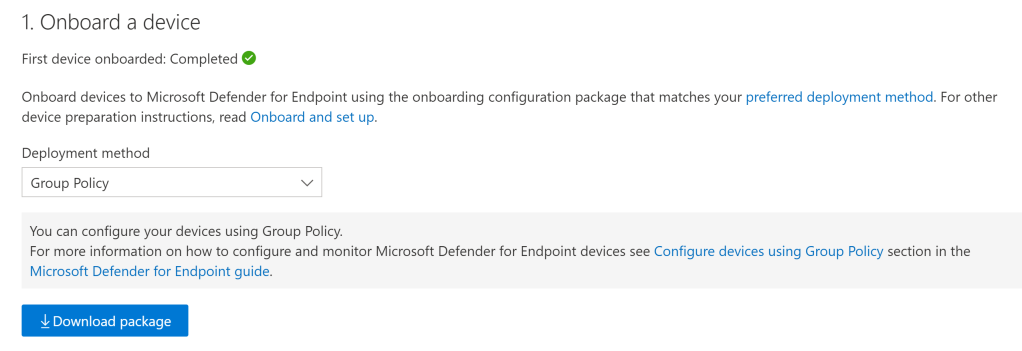
It is super important to roll out an EDR solution to get the visibility over all the endpoints. In this example, we are going to use Defender for Endpoint. During this phase, we are rolling out MDE on all the workstations, member servers, and Domain Controllers.
The first step is to download the onboard package and roll it out via something like Group Policy. All the steps have been documented here
The second step is to receive all the alerts that may trigger. Once an attacker is making too much noise, we may catch the attacker activity and discover on which machine it was occurred.

If we can verify that a machine has been owned and the attacker has touched it. We have to disconnect the machine from the network. This includes disconnecting the machine from being domain joined and revoking the VPN certificate.
DSRM Account
Ensure that the DSRM account is protected. This account can be used in disaster recovery scenarios, once every account has been locked out for instance. For further information. Please check out: https://theitbros.com/access-domain-controller-from-local-dsrm-account/
Summary
Active Directory is the identity infrastructure for most organizations, so keeping it secure requires a lot of effort. Yes, we live in a ”Cloud” world, but since most organizations operate in a Hybrid scenario. We can’t just put the focus only on all the new stuff in the Cloud.
Make sure you protect your On-Premises Identities from exposing their credential footprint on all the lower trusted systems. This is the primary reason, why it is so easy for attackers to move laterally. Since high-privileged credentials are everywhere..
Last, but not least. Please have a incident response & disaster recovery plan. Your organization and any potential IR team will be grateful for it.
Reference
- Advice for incident responders on recovery from systemic identity compromises: https://www.microsoft.com/security/blog/2020/12/21/advice-for-incident-responders-on-recovery-from-systemic-identity-compromises/
- Active Directory Forest Recovery Prerequisites: https://docs.microsoft.com/en-us/windows-server/identity/ad-ds/manage/ad-forest-recovery-prerequisties
- Script to reset the KRBTGT password: https://github.com/microsoft/New-KrbtgtKeys.ps1/blob/master/New-KrbtgtKeys.ps1
- Microsoft LAPS: https://www.microsoft.com/en-us/download/details.aspx?id=46899
- Evaluate Microsoft Defender for Endpoint: https://docs.microsoft.com/en-us/microsoft-365/security/defender-endpoint/evaluate-mde?view=o365-worldwide
- Use Netdom.exe to reset machine account passwords of a Windows Server domain controller: https://docs.microsoft.com/en-us/troubleshoot/windows-server/windows-security/use-netdom-reset-domain-controller-password
- Certificate Pre-Owned: https://www.specterops.io/assets/resources/Certified_Pre-Owned.pdf

Nice !
LikeLike